- HubPages»
- Technology»
- Computers & Software»
- Computer Software»
- Office Software Suites»
- Microsoft Office
How to Insert a Drop Down Box in Excel

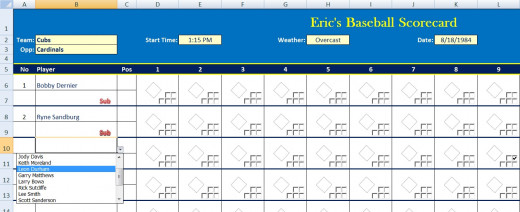
Inserting a drop down box in Excel is a straightforward and simple process that is a great way to improve the efficiency of your workbook. In my job as an accountant, I use them on a daily basis and have found them to be a very powerful and indispensable tool. Drop down boxes are great for limiting what data can be put into a particular cell, controlling what data is displayed, and controlling how data is summarized. Below is an example of a drop down box in a Baseball Scorecard that I created in Excel.
Creating a Drop Down Box in Excel
As an example, I will demonstrate how to create a drop down box that allows the user to choose the current month. I use this particular drop down box on a regular basis and it is a huge time saver. You can make any list into a drop down box using these instructions.
Have you ever created a drop down box in Excel before?
Define the Contents of the Drop Down List
Open a new workbook in Excel to get started. The first thing that I normally do when working with drop down boxes is to rename one of the tabs and call it the "Control" tab. It is a much cleaner way to keep this type of data separate and in one place. If you ever have to change anything you can easily click on this tab and make your adjustments. Before we can define the drop down list, the following needs to be entered into the "Control" tab in the corresponding cells:
- Cell B4 - enter "Month".
- Cell B5 - enter "January".
- Cell B6 - enter "February".
- Cell B7 - enter "March".
- Cell B8 - enter "April".
- Cell B9 - enter "May".
- Cell B10 - enter "June".
- Cell B11 - enter "July".
- Cell B12 - enter "August".
- Cell B13 - enter "September".
- Cell B14 - enter "October".
- Cell B15 - enter "November".
- Cell B16 - enter "December".
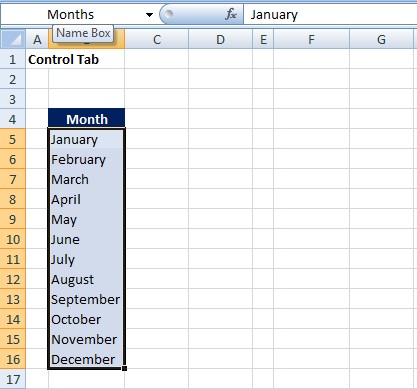
Next, highlight cells B5 through B16. In the "Name Box", which is to the left of the formula bar, enter "Months" as the name of the range. Below is a picture of what it should look like.
Tip: Once you set the name, the list will not pick up any value outside of the range. It will pickup anything that is changed inside of the list. If you wanted to add "Yearend" for instance, I would right-click on "December" and select "Insert". When the insert box pops up, select "Shift Cells Down" and click "OK". Then I enter "December" into B16 and enter "Yearend" in cell B17.
Tip: If you want to sort or order the list in a certain way, this is the place to do that.
Tip: The column width in the drop down box is driven by column B in the example.
Setting up the Drop Down Box
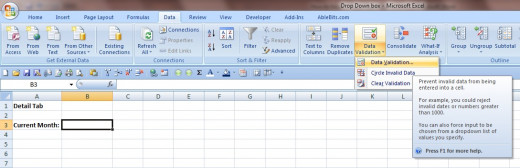
Click on a second tab and rename it as the "Detail" tab. In cell A3, enter "Current Month:". On the "Data" menu in Excel, click on the "Data Validation" arrow and select "Data Validation..."
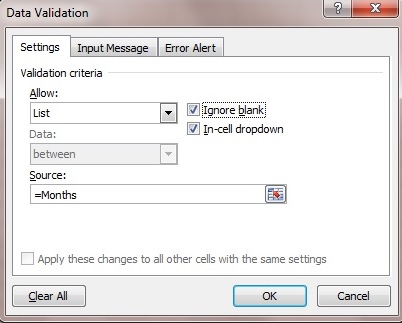
A "Data Validation" window will pop up. Under the "Allow:" drop down box select "List". In the "Source:" box enter "=Months". It is critical that the name that you type here is the exact same as what you typed in the "Name Box" on the other tab. If they are different, your drop down box will be empty. Also, be sure to leave the "Ignore blank" and "In-cell dropdown" boxes checked. The "Ignore blank" box is a toggle switch that ignores blanks if they appear in your list. Why would you want to leave blanks in there you may be thinking? It is one way to allow for future additions to the list.
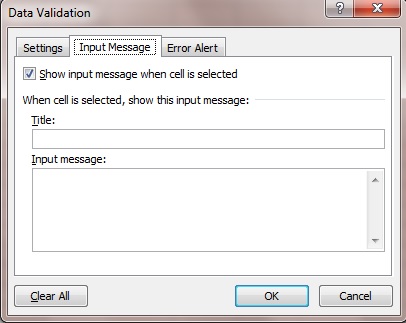
Next click on the "Input Message" tab and it is up to you as to whether or not that you put anything. In my experience, I always leave it blank. If you do enter an input message, every time that you click into the cell a box will pop up showing your input message. I find this feature very annoying to say the least, but some people may find it useful.
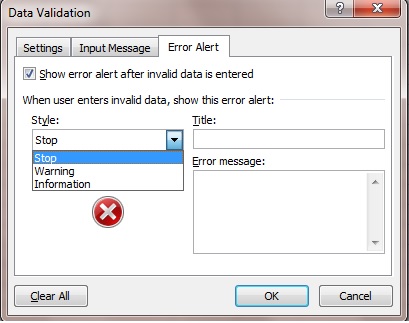
Finally, click on the "Error Alert" tab and select the warning style that you would like under the "Style" drop down menu. It does not matter which one you pick. Enter in an error message to display if someone tries to enter something different than what is contained in the list that we defined on the previous tab. I always do this step, especially if I am not the end user. Once you are done, click "OK".
Now you should see an arrow on the right-hand side of cell B3. Click on it and you will a drop down box that lists each month that we included on the list on the previous tab. Select whatever month that you want and notice that it will show up as you entered it. Excel will also allow you to enter a month name as long as it matches what is in the drop down list. Below is a picture of it.

Select a month and it will populate the cell with that month. One of the nice features of this is that you can copy cell B3 and paste it anywhere else you want and it will still contain the drop down box.
Ways to Use Drop Down Boxes in Excel
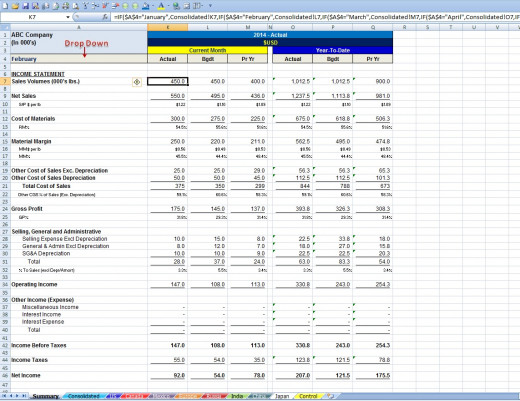
Drop down boxes can be used for an endless amount of applications. I normally use what we did above to control what data is shown and to control how it is summarized. For example, I am responsible for consolidating our global financial results each month at work. I use a drop down box to select the current month, which then controls what shows up in the current month and year to date columns. Here is an example of what that looks like:
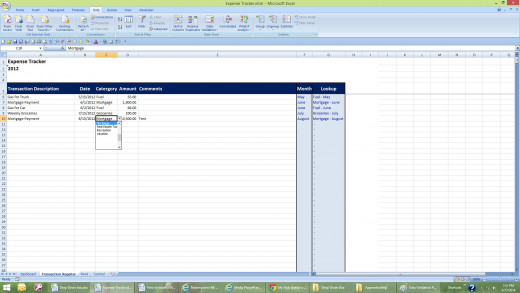
Another typical application that I have seen is when drop down boxes are used as part of a register to allow the user to select an appropriate value. A great example of this would be in a checkbook register with an expense category drop down box. Below is a picture of what that looks like:
Another way that I have seen drop down boxes used in Excel is in NCAA basketball brackets. The drop downs allow the user to select the team that they think is going to win each game using formulas behind the scene to drive what each drop down box has in it. This would be more difficult to setup because you have to move only the winning teams forward in it round.
Creating drop down lists in Google Docs
Comparing Combo Boxes and Drop Down Boxes
Combo boxes and drop down boxes are similar, but yet, very different. Both are able to control how data is summarized and are able to control what data is shown by using formulas. However, to drive a formula off of a combo box, you have to find where the box is linked to a specified cell. Drop down boxes allow you to run formulas directly against the cells that they appear in. Also, only drop down boxes built off a single list can have different values. Combo boxes, in order to have different values, must be each set up individually.
Inserting drop down boxes in Excel is a great way to save time and dramatically improve the efficiency of your spreadsheets. They have made my life so much easier when I can control the what data appears on a report. Feel free to contact me with any questions or comments.
Great resource for learning Excel

© 2014 Eric Cramer
Related

How to Make a Spreadsheet to Keep Track of Expenses

Excel: The Basics of Data Validation and Conditional Formatting

Microsoft Office Shortcuts: Quick, Easy, and Helpful Tips for Word, Excel, and PowerPoint

How to Populate HTML Drop Down List From Mysql Table Using Php Function?

How to use, create and configure ActiveX Controls List Boxes in Excel 2007 and Excel 2010


